Spring Batch is the Spring Project aimed to write Java Batch applications by using the foundations of Spring Framework.
Michael T. Minella, project lead of Spring Batch and also a member of the JSR 352 (Batch Applications for the Java Platform) expert group, wrote in his book Pro Spring Batch the next definition “Batch processing […] is defined as the processing of data without interaction or interruption. Once started, a batch process runs to some form of completion without any intervention“.
Typically Batch Jobs are long-running, non-interactive and process large volumes of data, more than fits in memory or a single transaction. Thus they usually run outside office hours and include logic for handling errors and restarting if necessary.
Spring Batch provides, among others, the next features:
- Transaction management, to allow you to focus on business processing.
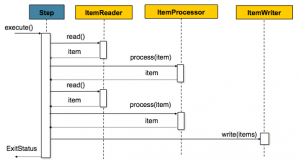
- Chunk based processing, to process a large value of data by dividing it in small pieces.
- Start/Stop/Restart/Skip/Retry capabilities, to handle non-interactive management of the process.
- Web based administration interface (Spring Batch Admin), it provides an API for administering tasks.
- Based on Spring framework, so it includes all the configuration options, including Dependency Injection.
- Compliance with JSR 352: Batch Applications for the Java Platform.
Spring Batch concepts
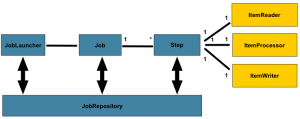
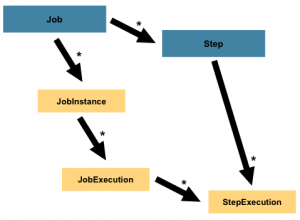
- Job: an entity that encapsulates an entire batch process. It is composed of one or more ordered Steps and it has some properties such as restartability.
- Step: a domain object that encapsulates an independent, sequential phase of a batch job.
- Item: the individual piece of data that it’s been processed.
- Chunk: the processing style used by Spring Batch: read and process the item and then aggregate until reach a number of items, called “chunk” that will be finally written.
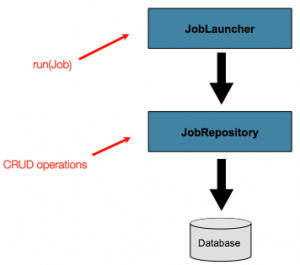
- JobLauncher: the entry point to launch Spring Batch jobs with a given set of JobParameters.
- JobRepository: maintains all metadata related to job executions and provides CRUD operations for JobLauncher, Job, and Step implementations.
Running a Job
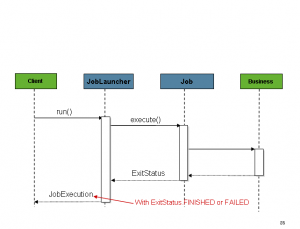
The JobLauncher interface has a basic implementation SimpleJobLauncher whose only required dependency is a JobRepository, in order to obtain an execution, so that you can use it for executing the Job.
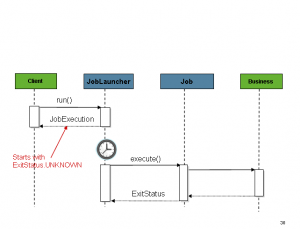
You can also launch a Job asynchronously by configuring a TaskExecutor. You can also this configuration for running Jobs from within a Web Container.
A JobLauncher uses the JobRepository to create new JobExecution objects and run them.
Running Jobs: concepts
The main concepts related with Job execution are
- JobInstance: a logical run of a Job.
- JobParameters: a set of parameters used to start a batch job. It categorizes each JobInstance.
- JobExecution: physical runs of Jobs, in order to know what happens with the execution.
- StepExecution: a single attempt to execute a Step, that is created each time a Step is run and it also provides information regarding the result of the processing.
- ExecutionContext: a collection of key/value pairs that are persisted and controlled by the framework in order to allow developers a place to store persistent state that is scoped to a StepExecution or JobExecution.
Sample application
Now we are going to see a simple sample application that reads a POJO that represents a Person from a file containing People data and after processing each of them, that is just uppercase its attributes, saving them in a database.
All the code is available at GitHub.
Let’s begin with the basic domain class: Person, just a POJO.
|
1 2 3 4 5 6 7 |
package com.malsolo.springframework.batch.sample; public class Person { private String lastName; private String firstName; //... } |
Then, let’s see the simple processor, PersonItemProcessor. It implements an ItemProcessor, with a Person both as Input and Output.
It provides a method to be overwritten, process, that allows you to write the custom transformation.
|
1 2 3 4 5 6 7 8 9 10 11 12 13 14 15 16 17 18 19 |
package com.malsolo.springframework.batch.sample; import org.springframework.batch.item.ItemProcessor; public class PersonItemProcessor implements ItemProcessor<Person, Person> { @Override public Person process(final Person person) throws Exception { final String firstName = person.getFirstName().toUpperCase(); final String lastName = person.getLastName().toUpperCase(); final Person transformedPerson = new Person(firstName, lastName); System.out.println("Converting (" + person + ") into (" + transformedPerson + ")"); return transformedPerson; } } |
Once done this, we can proceed to configure the Spring Batch Application, for doing so, we’ll use Java Annotations in a BatchConfiguration file:
|
1 2 3 4 5 6 7 8 9 10 11 12 13 14 15 16 17 18 19 20 21 22 23 24 25 26 27 28 29 30 31 32 33 34 35 36 37 38 39 40 41 42 43 44 45 46 47 48 49 50 51 52 53 54 55 56 57 58 59 60 61 62 63 64 65 66 |
// Imports and package omitted @Configuration @EnableBatchProcessing @Import(AdditionalBatchConfiguration.class) public class BatchConfiguration { // Input, processor, and output definition @Bean public ItemReader<Person> reader() { FlatFileItemReader<Person> reader = new FlatFileItemReader<Person>(); reader.setResource(new ClassPathResource("sample-data.csv")); reader.setLineMapper(new DefaultLineMapper<Person>() {{ setLineTokenizer(new DelimitedLineTokenizer() {{ setNames(new String[] {"firstName", "lastName"}); }}); setFieldSetMapper(new BeanWrapperFieldSetMapper<Person>() {{ setTargetType(Person.class); }}); }}); return reader; } @Bean public ItemProcessor<Person, Person> processor() { return new PersonItemProcessor(); } @Bean public ItemWriter<Person> writer(DataSource dataSource) { JdbcBatchItemWriter<Person> writer = new JdbcBatchItemWriter<Person>(); writer.setItemSqlParameterSourceProvider(new BeanPropertyItemSqlParameterSourceProvider<Person>()); writer.setSql("INSERT INTO people (first_name, last_name) VALUES (:firstName, :lastName)"); writer.setDataSource(dataSource); return writer; } // Actual job configuration @Bean public Job importUserJob(JobBuilderFactory jobs, Step s1) { return jobs.get("importUserJob") .incrementer(new RunIdIncrementer()) .flow(s1) .end() .build(); } @Bean public Step step1(StepBuilderFactory stepBuilderFactory, ItemReader<Person> reader, ItemWriter<Person> writer, ItemProcessor<Person, Person> processor) { return stepBuilderFactory.get("step1") .<Person, Person> chunk(10) .reader(reader) .processor(processor) .writer(writer) .build(); } @Bean public JdbcTemplate jdbcTemplate(DataSource dataSource) { return new JdbcTemplate(dataSource); } } |
Highlights for this class are:
- Line 2: @Configuration, this class will be processed by the Spring container to generate bean definitions.
- Line 3: @EnableBatchProcessing, provides a base configuration for building batch jobs by creating the next beans beans available to be autowired:
- JobRepository – bean name “jobRepository”
- JobLauncher – bean name “jobLauncher”
- JobRegistry – bean name “jobRegistry”
- PlatformTransactionManager – bean name “transactionManager”
- JobBuilderFactory – bean name “jobBuilders”
- StepBuilderFactory – bean name “stepBuilders”
We’ll see shortly how it works.
- Line 10: the reader bean, an instance of a FlatFileItemReader, that implements the ItemReader interface to read each Person from the file containing people. Spring Batch provides several implementations for this interface, being this implementation that read lines from one Resource one of them.You know, no need of custom code.
- Line 26: the processor bean, an instance of the previously defined PersonItemProcessor. See above.
- Line 31: the writer bean, an instance of a JdbcBatchItemWriter, that implements the ItemWriter interface to write the People already processed to the database. It’s also an implementation provided by Spring Batch, so no need of custom code again. In this case, you only have to provide an SQL, and a callback for the parameters. Since we are using named parameters, we’ve chosen a BeanPropertyItemSqlParameterSourceProvider. This bean also needs a DataSource, so we provided it by passing one as a method parameter in order to Spring inject the instance that it has registered.
- Line 42: a Job bean, that it’s built using the JobBuilderFactory that is autowired by passing it as method parameter for this @Bean method. When you call its get method, Spring Batch will create a job builder and will initialize its job repository, the JobBuilder is the convenience class for building jobs of various kinds as you can see in the code above. We also use a Step that is configured as the next Spring bean.
- Line 51: a Step bean, that it’s built using the StepBuilderFactory that is autowired by passing it as method parameter for this @Bean method, as well as the other dependencies: the reader, the processor and the writer previously defined. When calling the get method from the StepBuilderFactory, Spring Batch will create a step builder and will initialize its job repository and transaction manager, the StepBuilder is an entry point for building all kinds of steps as you can see in the code above.
This configuration is almost everything needed to configure a Batch process as defined in the concepts above.
Actually, only one configuration class needs to have the @EnableBatchProcessing annotation in order to have the base configuration for building batch jobs. Then you can define the job with their steps and the readers/processors/writers that they need.
But an additional data source is needed to be used by the JobRepository. For this sample we’ll use an in-memory one:
|
1 2 3 4 5 6 7 8 9 10 11 12 13 14 |
@Configuration public class DataSourceConfiguration { @Bean public DataSource dataSource() { EmbeddedDatabaseBuilder builder = new EmbeddedDatabaseBuilder(); return builder .setType(HSQL) .addScript("schema-all.sql") .addScript("org/springframework/batch/core/schema-hsqldb.sql") .build(); } } |
In this case we’ll use the same in-memory database, HSQL, with the schema for the application (line 9) and the schema for the job repository (line 10). The former is available as a resource of the application, the file called schema-all.sql, and the latter in the spring-batch-core jar (spring-batch-core-3.0.1.RELEASE.jar at the time of this writing)
Alternate Configuration
The official documentation shows an slightly different configuration by using the @Autowired annotation for the beans that @EnableBatchProcessing will create. Use the one that you like most. In this case they also imports the data base configuration.
|
1 2 3 4 5 6 7 8 9 10 11 12 13 14 15 16 17 18 19 20 21 22 23 24 25 26 27 28 29 |
@Configuration @EnableBatchProcessing @Import(DataSourceConfiguration.class) public class AppConfig { @Autowired private JobBuilderFactory jobs; @Autowired private StepBuilderFactory steps; // Input, processor, and output definition omitted @Bean public Job importUserJob() { return jobs.get("importUserJob").incrementer(new RunIdIncrementer()).flow(step1()).end().build(); } @Bean protected Step step1(ItemReader<Person> reader, ItemProcessor<Person, Person> processor, ItemWriter<Person> writer) { return steps.get("step1") .<Person, Person> chunk(10) .reader(reader) .processor(processor) .writer(writer) .build(); } } |
We chose another approach: we load it when configuring the application in the main method as you’ll see shortly. besides, we imported an additional batch configuration (see line 28 at BatchConfiguration.java) to provide an alternate way to launch the application.
Enable Batch Processing: how it works
As we said before, we will go a little deeper in how the annotation @EnableBatchProcessing works.
To remind its goal, this annotation provides a base configuration for building batch jobs by creating a list of beans available to be autowired. An extract of the source code gives us a lot of information:
|
1 2 3 4 5 6 7 8 9 10 11 12 13 14 |
@Target(ElementType.TYPE) @Retention(RetentionPolicy.RUNTIME) @Documented @Import(BatchConfigurationSelector.class) public @interface EnableBatchProcessing { /** * Indicate whether the configuration is going to be modularized into multiple application contexts. If true then * you should not create any @Bean Job definitions in this context, but rather supply them in separate (child) * contexts through an {@link ApplicationContextFactory}. */ boolean modular() default false; } |
As you can see at line 4, this annotation imports an implementation of an ImportSelector, one of the options to import beans in a configuration class, in particular, to selective import beans according to certain criteria.
This particular implementation, BatchConfigurationSelector, instantiates the expected beans for providing common structure for enabling and using Spring Batch based in the EnableBatchProcessing’s attribute modular.
There are two implementations depending on whether you want the configuration to be modularized into multiple application contexts so that they don’t interfere with each other with the naming and the uniqueness of beans (for instance, beans named reader) or not. They are ModularBatchConfiguration and SimpleBatchConfiguration respectively. Mainly they both do the same, but the former using an AutomaticJobRegistrar which is responsible for creating separate ApplicationContexts for register isolated jobs that are later accesible via the JobRegistry, and the latter just creates the main components as lazy proxies that only initialize when a method is called (in order to prevent configuration cycles)
The key concept here is that both extends AbstractBatchConfiguration that uses the core interface for this configuration: BatchConfigurer.
The default implementation, DefaultBatchConfigurer, provides the beans mentioned above (jobRepository, jobLauncher, jobRegistry, transactionManager, jobBuilders and stepBuilders), for doing so it doesn’t require a dataSource, it’s Autowired with required to false, so it will use a Map based JobRepository if its dataSource is null, but you have take care if you have a dataSource eligible for autowiring that doesn’t contain the expected database schema for the job repository: the batch process will fail in this case.
Spring Boot provides another implementation, BasicBatchConfigurer, but this is out of the scope of this entry.
With all this information, we already have a Spring Batch application configured, and we more or less know how this configuration is achieved using Java.
Now it’s time to run the application.
Running the sample: JobLauncher
We have all we need to launch a batch job, the Job to be launched and a JobLauncher, so wait no more and execute this main class: MainJobLauncher.
|
1 2 3 4 5 6 7 8 9 10 11 12 13 14 15 16 17 18 19 20 21 22 23 24 25 |
@Component public class MainJobLauncher { @Autowired JobLauncher jobLauncher; @Autowired Job importUserJob; public static void main(String... args) throws JobParametersInvalidException, JobExecutionAlreadyRunningException, JobRestartException, JobInstanceAlreadyCompleteException { AnnotationConfigApplicationContext context = new AnnotationConfigApplicationContext(ApplicationConfiguration.class); MainJobLauncher main = context.getBean(MainJobLauncher.class); JobExecution jobExecution = main.jobLauncher.run(main.importUserJob, new JobParameters()); MainHelper.reportResults(jobExecution); MainHelper.reportPeople(context.getBean(JdbcTemplate.class)); context.close(); } } |
First things first. This is the way I like to write main classes. Some people from Spring are used to writing main classes annotated with @Configuration, but I’d rather to annotate them as @Components in order to separate the actual application and its configuration from the classes that test the functionality.
As Spring component (line 1), it only needs to have the dependencies @Autowired.
That’s the reason for the ApplicationConfiguration class. It’s a @Configuration class that also performs a @ComponentScan from its own package, that will find the very MainJobLauncher and the remain @Configuration classes, because they are also @Components: BatchConfiguration and DataSourceConfiguration.
As a main class, it creates the Spring Application Context (line 12), it gets the component as a Spring bean (line 14) and then it uses its methods (or attributes in this example. Line 16)
Let’s back to the Batch application: the line 16 is the call to the JobLauncher that will run the Spring Batch process.
The remaining lines are intended to show the results, both from the job execution and the results in the database.
It will be something like this:
|
1 2 3 4 5 6 7 8 9 10 11 12 13 14 15 16 17 18 19 20 |
*********************************************************** importUserJob finished with a status of (COMPLETED). * Steps executed: step1 : exitCode=COMPLETED;exitDescription= StepExecution: id=0, version=3, name=step1, status=COMPLETED, exitStatus=COMPLETED, readCount=5, filterCount=0, writeCount=5 readSkipCount=0, writeSkipCount=0, processSkipCount=0, commitCount=1, rollbackCount=0 *********************************************************** *********************************************************** * People found: * Found firstName: JILL, lastName: DOE in the database * Found firstName: JOE, lastName: DOE in the database * Found firstName: JUSTIN, lastName: DOE in the database * Found firstName: JANE, lastName: DOE in the database * Found firstName: JOHN, lastName: DOE in the database *********************************************************** |
Running the sample: CommandLineJobRunner
CommandLineJobRunner is a main class provided by Spring Batch as the primary entry point to launch a Spring Batch Job.
It requires at least two arguments: JobConfigurationXmlPath/JobConfigurationClassName and jobName. With the first, it will create an ApplicationContext by loading a Java Configuration from a class with the same name or by loading an XML Configuration file with the same name.
It has a JobLauncher attribute that is autowired with the application context via its AutowireCapableBeanFactory exposed, that is used to autowire the bean properties by type.
It accepts some options (“-restart”, “-next”, “-stop”, “-abandon”) as well as parameters for the JobLauncher that are converted with the DefaultJobParametersConverter as JobParametersConverter that expects a ‘name=value’ format.
You can declare this main class in the manifest file, directly or using some maven plugin as maven-jar-plugin, maven-shade-plugin or even exec-maven-plugin.
That is, you can invoke from your command line something like this:
$ java CommandLineJobRunner job.xml jobName parameter=value
Well, the sample code is a maven project that you can install (it’s enough if you package the application) and it allows to manage the dependencies (the mvn dependency:copy-dependencies command copies all the dependencies in the target/dependency directory)
To simplify, I’ll also copy the generated jar to the same directory of the dependencies in order to invoke the java command more easily:
|
1 2 3 4 5 6 7 8 9 10 11 12 13 14 15 16 17 18 19 20 21 22 23 24 |
~/Documents/git/spring-batch-sample$mvn clean install [INFO] Scanning for projects... ... [INFO] ------------------------------------------------------------------------ [INFO] BUILD SUCCESS [INFO] ------------------------------------------------------------------------ ... ~/Documents/git/spring-batch-sample$ mvn dependency:copy-dependencies [INFO] Scanning for projects... ... [INFO] Copying spring-batch-core-3.0.1.RELEASE.jar to ~/Documents/git/spring-batch-sample/target/dependency/spring-batch-core-3.0.1.RELEASE.jar ... [INFO] ------------------------------------------------------------------------ [INFO] BUILD SUCCESS [INFO] ------------------------------------------------------------------------ ... ~/Documents/git/spring-batch-sample$ cp target/spring-batch-sample-0.0.1-SNAPSHOT.jar ./target/dependency/ ~/Documents/git/spring-batch-sample$ java -classpath "./target/dependency/*" org.springframework.batch.core.launch.support.CommandLineJobRunner com.malsolo.springframework.batch.sample.ApplicationConfiguration importUserJob ... 12:32:17.039 [main] INFO o.s.b.c.l.support.SimpleJobLauncher - Job: [FlowJob: [name=importUserJob]] completed with the following parameters: [{}] and the following status: [COMPLETED] ... |
That’s all for now.
Since this entry is becoming very large, I’ll explain other ways to run Spring Batch Jobs in a next post.

